How Santa Sleighed our Backend

Like anyone that has worked in the IT industry for as long as I have, I’ve encountered my fair share of horror stories (or learning opportunities, as we later learned to call them), where technology lets you down or behaves in completely unforeseen ways, with highly stressful consequences.

One of my all-time favourite examples of this (although it didn’t feel like it at the time) involved Santa Claus, of all people, and having told the story in person so many times, I finally found the time to write it down (just in time for Christmas) in all its glorious detail.

Full credit goes to Evan Shortiss and Philip Hayes (who lived through this with us) for helping to tell the story in this format, with Evan devising the article title and Philip providing the technical accuracy to back it up. So here goes…

A Christmas Tale

It was 23 December 2011 and the hardworking staff at our startup company, which was punching above its weight in the mobile applications and cloud space at the time, were on the wind down to a well deserved Christmas break after a very busy and successful year.

‘Twas two nights before Christmas, when all through the house, not an engineer was stirring, not even their mouse…

As their Cloud Operations team had done their due diligence and introduced a platform change freeze the week before (notifying customers accordingly and finalising a support crew that could assist if any issues arose during the holidays, which rarely happened anyway), most of the staff has already started their holidays in the days before, so the office was pretty calm and quiet.

One of our larger profile customers at the time ran the local national airport and were using a custom solution powered by our platform to provide flight information and other services to airport customers. Their solution comprised a publicly available, cross-platform mobile app with a cloud-based, Node.js backend that integrated with some of their own backend systems, parsing data that was delivered via a message queue and storing it in a local cache.

Then, suddenly, the phone rang…

Panic Stations

The customer’s mobile app had just stopped working on the busiest day of the year, leaving thousands of passengers virtually stranded, with no up-to-date flight information. Nothing had changed, though; we were in a change freeze and this same application had been operating flawlessly for months, processing hundreds of thousands of messages without issue. This was quickly verified by the dutiful support crew who confirmed that no changes had been made to the front-end or back-end of the application, and yet the mobile app continued to fail.

In the hours that followed, long into the evening that was, almost every engineer in the company was summoned back from holidays to help get to the root cause of this issue, with stress levels on the increase and patience declining fast. There was also no sign of anyone that looked even remotely like Hans Gruber to blame for the drama that ensued 🙂

Some time later, one of the engineers discovered (via some system logs) that some of the code responsible for parsing messages from the customer’s backend systems was throwing errors. Specifically, the code that mapped airline (ICAO) codes to human readable airline names had a hardcoded table with predefined entries, supporting only the entries in that table and generating errors for anything else it encountered.

Having verified that there was, in fact, decent error handling in place for the code segment in question, this still did not explain why the backend application was still crashing continuously. A few more hours passed and attention turned to the actual data being sent by the customer’s messaging system. It was not the only remaining variable in the entire equation at hand.

Learning Opportunities

And then, suddenly, there it was, staring us in our (now very red) faces. Santa was on his way!

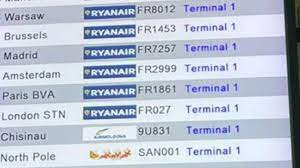
It turns out that, through their inner child and the goodness of their hearts, and in keeping with what had become an annual tradition, the airport IT staff had injected a fake flight (by Santa Airlines) into the arrivals messaging queue. However, the associated airline code (SAN) was not in the table of predefined entries in the backend application, so was generating an error.

However, cruelly, it then transpired that while the error was being caught and handled, there was a small bug in the error handling routine which was preventing the application from processing subsequent messages, ultimately causing it to crash, over and over again. 

So, in the end, the addition of a fake flight to bring some festive cheer to airport customers and their families exposed a hidden bug in our application, which “sleighed” our backend!

Lessons Learned

No matter how reliable you believe your data is, or how long your application has been running without issue, edge cases will still happen. A simple unit test would have caught the bug described above and prevented this high profile system from failing at one of the busiest times of the year, causing enormous amounts of stress to everyone involved.

Building a Cloud while in the Clouds

So you’re heading to the US for some business meetings with your Chief Architect then you get upgraded to business class where there’s free WiFi and you’ve got 6 hours to kill. You options are watch movies (seen them all before), drink wine (a given) and/or have an in-flight hackathon to test out the quality of the WiFi.

And so we did just that and went ahead and provisioned an instance of the latest Aerogear Mobile Services powered by OpenShift Origin, resulting in very own cloud platform built in the clouds!

Indeed, the Internet connection was spotty at best but in between the spottiness, our installer script did run to completion…

…and we did (eventually) get the all-elusive OpenShift Console with the Mobile tab in all it’s beautiful glory.

We also needed to get very creative in order to share the screen shots (which involved USB-C cables and several other travel accessories that only an Architect and Director would have) despite physically sitting beside each other, but such is life. And for good measure, we also published this blog article from the air!

So what have you done to test your in-flight WiFi and how was it for you?

A case for more Open Source at Apple

Open Source Context

I’ve been involved in the software industry for almost 30 years and have long been an admirer of open source software, both in terms of what it stands for and in terms of the inherent value it provides to the communities that create it and support it.

I’m even old enough to remember reading about the creation of the Free Software Foundation itself by Richard Stallman in 1985 and couldn’t be happier to now find myself working at the king pins of open source, Red Hat (through the acquisition of FeedHenry in 2014).

And while in recent years it’s been reassuring to see more and more other companies adopt an open source strategy for some of their products, including the likes of Apple and Microsoft, it’s been equally soul destroying having to live with the continued closed source nature of some of their other products. Take Apple’s Photos app for iOS as a case in point.

Apple iPhoto

Some time around 2011, I took the decision to switch to Apple’s excellent iPhoto app for managing my personal photo collection, principally due the facial recognition and geolocation features but also because of the exceptional and seamless user experience across the multitude of Apple devices I was amassing.

Then, in late 2012, I undertook a very lengthly personal project (spanning 9 months or more) to convert my extended family’s vintage photo collection to digital format, importing them to iPhoto and going the extra mile to complete the facial and location tagging also.

The resultant experience was incredible, particularly when synced onto my iPad of the time (running iOS 6). Hours at a time were spent perusing through the memories it invoked, with brief interludes of tears and laughter along the way. What was particularly astonishing was how the older generations embraced the iPad experience within minutes of holding the device for the very first time. This was the very essence of what Steve Jobs worked his entire life for, and for this I am eternally grateful to the genius he clearly was.

Apple Photos

However, since then, with the launch of subsequent releases of iOS I have never been able to recreate the same experience, for two reasons.

Firstly, the user interface of the iPhoto app kept changing (becoming less intuitive each time, proven by the lessening magic experienced by the same generation that previously loved it so much), and secondly, it was replaced by the Photos app outright which, incredibly, has one simple but quite incredulous bug – it cannot sort!

Yes, quite incredibly, the Photos app for iOS cannot sort my photos when using the Faces view. If you don’t believe me, just Google phrase “apple photos app sort faces” and take your pick of the articles lamenting such a rudimentary failing.

A Case for Open Source

So what does this have to with open source?“, I hear you ask.

Well, trawling through the countless support articles on Apple’s user forums, it seems that this bug has been confirmed by hundreds of users but, several years later, it is still not fixed. If this was an open source project, it would have been long since fixed by any one of a number of members of the community I’m sure would form around it, and potentially even by me!

So c’mon Apple, let’s have some more open source and let’s make your products better, together.

A Simple Model for Managing Change Windows

One of the more common things we do in the Cloud Operations team at Red Hat Mobile is facilitate changes to environments hosted on the Red Hat Mobile Application Platform, either on behalf of our customers or for our own internal operational purposes.

These are normally done within what is commonly known as a “Change Window”, which is a predetermined period of time during which specific changes are allowed to be made to a system, in the knowledge that fewer people will be using the system or where some level of service impact (or diminished performance) has been deemed acceptable by the business owner.

We have used a number of different models for managing Change Windows over the years, but one of our favourite approaches (that adapts equally well to both simple and complex changes and that is easy for our customers and internal stakeholders to understand) is this 5-phase model.

Planning

The planning phase is basically about identifying (and documenting) a solid plan that will serve as a rule book for all the other elements in this model (below). In addition to specifying the (technical) steps required to make (and validate) the necessary changes, your plan should also include additional (non-technical) information that you will most likely need to share externally so as to set the appropriate expectations with the affected users. This includes specifying:

  • What changes are you planning to make?
  • When are you proposing to make them?
  • How long will they take to complete?
  • What will the impact (if any) be on the users of the system before, during and after the changes are made?
  • Is there anything your customers/users need to do beforehand or afterwards?
  • Why are you making these changes?

Your planning phase should also include a provision for formally communicating the key elements of your plan (above) with those interested in (or affected by) it.

Commencement

The commencement phase is about executing on the elements of your plan that can be done ahead of time (i.e. in the hours or minutes before the Change Window formally opens) but that do not involve any actual changes.

Examples include:

  1. Capturing the current state of the system (before it is changed) so that you can verify the system has returned to this state afterwards.
  2. Issuing a final communication notice to your users, confirming that the Change Window is still going ahead.
  3. Configuring any monitoring dashboards so that the progress (and impact) of the changes can be analysed in real time once they commence.

The commencement phase can be a very effective way to maximise the time available during the formal Change Window itself, giving you extra time to test your changes or handle any unexpected issues that arise.

Execution

The execution phase is where the planned changes actually take place. Ideally, this will involve iterating through a predefined set of commands (or steps) in accordance with your plan.

One important mantra which has stood us in good stead here over the years is, “stick to the plan”. By this we mean, within reason, try not to get distracted by minor variations in system responses which could consume valuable time, to the point where you run out of time and have to abandon (or roll back) your changes.

It’s also strongly recommended that the input to (and outputs from) all commands/steps are recorded for reference. This data can be invaluable later on if there is a delayed impact on the system and steps need to be retraced.

Validation

Again this phase should be about iterating through a predefined set of verification steps that may include examining various monitoring dashboards, running automated acceptance/regression test tooling, all in accordance with two very basic principles:

  1. Have the changes achieved what they were designed to (i.e. does the new functionality work)?
  2. Have there been any unintended consequences of the changes (i.e. does all the old functionality still work, or have you broken something)?

Again, it’s very important to capture evidence of the outcomes from validation phase, both as evidence to confirm the changes have been completed successfully and that the system has returned to it’s original state.

All Clear

This phase is very closely linked to the validation phase but is slightly more abstract (and usually less technical) in nature. It’s primary purpose is to act as a higher-level checklist of tasks that must to be completed, in order that the final, formal communication to the customer (or users) can be sent, confirming that the work has been completed and verified successfully.


How to exhaust the processing power of 128 CPUs

Amazon Web Services launched another first earlier this year in the form of a virtual server (or EC2 instance as they call it) with a staggering 128 virtual CPUs and over 1.9 Terabytes of memory.

The instance, which is an x1.32xlarge in their naming scheme, could cost you as much as $115,000 per year to operate but you could certainly reduce that figure significantly (e.g. $79,000) if you knew ahead of time that you would be running it 24×7 during that time.

In any case, during a recent experiment using one of these instances, we set about trying to find some novel ways to max out the processing power and memory, and here are the two techniques we settled on (with evidence of each of them in action).

CPU Exhaustion

This was strangely a lot easier than we expected and simply involved using the Unix yes command which, it seems, draws excessive amounts of processing power when used in isolation from it’s normal purpose.

So for our x1.32xlarge instance, with it’s 128 vCPUs, we used the command below to spawn 127 processes each running the yes command and we then monitored it’s impact using the htop command.

$ for i in {1..127}; do yes>/dev/null & done

And here it is in action:

The reason for spawning just 127 processes (instead of the full 128) was to ensure that the htop monitoring utility itself would have enough resources to be able to function, which can been seen clearly above.

Memory Exhaustion

Exhausting the memory was a little harder (to do quickly) but one of the more hard-core Unix guys came up with this old-school beauty which combines the processor-hungry yes command with some complex character replacements, plus searches for character sequences that will never be found.

$ for i in `seq 1 40`; do cat <(yes | tr \\n x | head -c $((10240*1024*4096))) <(sleep 18000) | grep n &  done

And here it is in action too, noting the actual memory usage in the bottom, left:

Note also that the CPU usage, while almost at the limit, is not as clear-cut as before and all processors are being utilised equally (for the most part). Note also the Load Average of 235 (bottom, right of centre) which supports the theory that Unix systems can theoretically sustain load averages of twice the number of processors before encountering performance issues. Some folks believe this to be closed to one times the number of processors but the results above suggest otherwise.

Amazon Web Services X1

The original announcement of the X1 instance type is available at:

Monitoring the Health of your Security Certificates

Security Certificates

Most modern websites are protected by some form of Security Certificate that ensures the data transmitted from your computer to it (and vice versa) is encrypted. You can usually tell if you are interacting with an encrypted website via the presence of a padlock symbol (usually green in colour) near the website address in your browser.

These certificates are more commonly known as SSL Certificates but in actual fact, the more technically correct name for them is TLS Certificates (it’s just that nobody really calls them that as the older name has quite a sticky sound/feel to it).

Certificate Monitoring

In any case, one of the things we do a lot of at Red Hat Mobile is monitoring, and over the years we’ve designed a large collection of security certificate monitoring checks. The majority of these are powered by the OpenSSL command-line utility (on a Linux system), which contains some pretty neat features.

This article explains some of my favourite things you can do with this utility, targeting a website secured with an SSL Certificate.

Certificate Analysis

Certificate Dumps

Quite often, in order to extract interesting data from a security certificate you first need to dump it’s contents to a file (for subsequent analysis):

$ echo "" | openssl s_client -connect <server-address>:<port> > /tmp/cert.txt

You will, of course, need to replace <server-address> and <port> with the details of the particular website you are targeting.

Determine Expiry Date

Using the dump of your certificate from above, you can then extract it’s expiry date like this:

$ openssl x509 -in /tmp/cert.txt -noout -enddate|cut -d"=" -f2

Determine Common Name (Subject)

The Common Name (sometimes called Subject) for a security certificate is the website address by which the secured website is normally accessed. The reason it is important is that, in order for your website to operate securely (and seamlessly to the user), the Common Name in the certificate must match the server’s Internet address.

$ openssl x509 -in /tmp/cert.txt -noout -subject | sed -n '/^subject/s/^.*CN=//p' | cut -d"." -f2-

Extract Cipher List

This is a slightly more technical task but useful in some circumstances nevertheless (e.g. when determining the level or encryption being used).

$ echo "" | openssl s_client -connect <server-address>:<port> -cipher

View Certificate Chain

In order that certain security certificates can be verified more thoroughly, a trust relationship between them and the Certificate Authority (CA) that created them must be established. Most desktop web browsers are able to do this automatically (as they are pre-programmed with a list of authorities they will always trust) but some mobile devices need some assistance with establishing this trust relationship.

To assist such devices with this, the website administrator can opt to install an additional set of certificates on the server (sometimes known as Intermediate Certs) which will provide a link (or chain) from the server to the CA. This chain can be verified as follows:

$ echo "" | openssl s_client -connect <server-address>:<port> -showcerts -status -verify 0 2>&1 | egrep "Verify return|subject=/serial"

The existence of the string “0 (ok)” in the response indicates a valid certificate chain.

OpenSSL

You can find out more about the openssl command-line utility at http://manpages.ubuntu.com/manpages/xenial/en/man1/openssl.1ssl.html.

The True Value of a Modern Smartphone

While vacationing with my family recently, I stumbled into a conversation with my 11-year old daughter about smartphones and the ever growing number of other devices they are replacing as they digitally transform our lives.

For fun, we decided to compare the relative cost of the vacation with and without my smartphone at the time (a Samsung Galaxy S3, by the way) and by imagining if we’d taken the same vacation a mere 10 years earlier, how much extra would that vacation have cost without the same smartphone?

Smart Cost Savings

I was actually quite shocked at the outcome, both in terms of the number of other devices the modern smartphone now replaces (we managed to count 10) and at the potential cost savings it can yield, which we estimated at a whopping $3,450!

Smart Cost Analysis

The estimations below are really just for fun and are not based on very extensive research on my part (more of a gut feeling about a moment in time, plus some quick Googling). You can also assume a 3-week vacation near some theme parks in North America.

Telephony: $100

Assuming two 15 minute phone calls per week, from USA to Ireland, at mid-week peak rates, you could comfortably burn $100 here.

Camera: $1,000

Snapping around 1,000 old-school, non-digital photos (at 25 photos per 35mm roll of film) would require approximately 40 rolls of film (remember, no live preview). Then factoring in the cost of a decent SLR camera, plus plus the cost of developing those 40 rolls of film, you could comfortably spend well in excess of $1,000 here.

Of course digital cameras would indeed have been an option 10 years ago too but it’s unreasonable to suggest that a decent digital camera (with optical zoom, of sufficient portability and quality for a 3-week family vacation) could also have set you back $1,000.

Music Player: $300

The cost of an Apple iPod in 2005 was around $299.

GPS / Satellite Navigation: $400

It’s possible that in 2005, the only way to obtain a GPS system for use in North America was to rent one from the car rental company. Today, this costs around $10 per day, so let’s assume it would have cost around/under $20 in 2005.

Games Console: $300

The retail price for a Nintendo DS in 2005 was $149.99 but you also need to add in the cost of a selection of games, which cost around $50 each. Let’s be reasonable and suggest 3 games (one for each week of the vacation).

Laptop Computer: $1,000

I’m not entirely sure how practical/easy it would have been to access the Internet (at the same frequency) while on vacation in 2005 (i.e. how many outlets offered WiFi at all, never mind free WiFi). Internet Café’s would have been an option too, but would not have offered the levels of flexibility I’d had needed to catch up on emails and update/author some important business documents, so let’s assume the price of a small laptop here.

Mobile Hotspot / MiFi: $200

Again, not quite sure if these were freely available (or feasible) in 2005, but let’s nominally assume they were and price them at double what they cost today, plus $100 for Internet access itself

Alarm Clock: $50

I guess you could request a wake up call in your hotel but if you were not staying in a hotel and needed an alarm clock, you’d either have needed a watch with one on it, or had to purchase an alarm clock.

Compass: $50

Entirely optional of course, but if you’re the outdoor type and fancy a little roaming in some of the national parks, you might like to have a decent compass with you.

Torch: $50

Again, if you’re the outdoor type, or just like to have some basic/emergency tools with you on vacation, you might have brought (or purchased) a portable torch or Maglite Flashlight.

10 Ways to Analyzing your Apache Access Logs using Bash

Since it’s original launch in 1995, the Apache Web Server continues to be one of the most popular web servers in use today. One of my favourite parts of working with Apache during this time has been discovering and analysing the wealth of valuable information contains its access logs (i.e. the files produced on foot of general usage from users viewing the websites served by Apache on a given server).

And while there are plenty of free tools available to help analyse and visualise this information (in an automated or report-driven way), it can often be quicker (and more efficient) to just get down and dirty with the raw logs and fetch the data you need that way instead (subject to traffic volumes and log file sizes, of course). This is also a lot more fun.

For the purposes of this discussion, let’s assume that you are working with compressed backups of the access logs and have a single, compressed file for each day of the month (e.g. the logs were rotated by the operating system). I’m also assuming that you are using the standard “combined” LogFormat.

1. Total Number of Requests

This is just a simple word count (wc) on the relevant file(s):

Requests For Single Day

$ zcat access.log-2014-12-31.gz | wc -l

Requests For Entire Month

$ zcat access.log-2014-12-*.gz | wc -l

2. Requests per Day (or Month)

This will show the number of requests per day for a given month:

$ for d in {01..31}; do echo "$d = `zcat access.log-2014-12-$d.gz | wc -l`"; done

Or the requests per month for a given year:

$ for m in {01..12}; do echo "$m = `zcat access.log-2014-$m-*.gz | wc -l`"; done

3. Traffic Sources

Show the list of unique IP addresses the given requests orginated from:

$ zcat access.log-2014-12-31.gz | cut -d" " -f1 | sort | uniq

List the unique IP addresses along with the number of requests from each, from lowest to highest:

$ zcat access.log-2014-12-31.gz | cut -d" " -f1 | sort | uniq -c | sort -n

4. Traffic Volumes

Show the number of requests per minute over a given day:

$ zcat access.log-2014-12-31.gz | cut -d" " -f4 | cut -d":" -f2,3 | uniq -c

Show the number of requests per second over a given day:

$ zcat access.log-2014-12-31.gz | cut -d" " -f4 | cut -d":" -f2,3,4 | uniq -c

5. Traffic Peaks

Show the peak number of requests per minute for a given day:

$ zcat access.log-2014-12-31.gz | cut -d" " -f4 | cut -d":" -f2,3 | uniq -c | sort -n

Show the peak number of requests per second for a given day:

$ zcat access.log-2014-12-31.gz | cut -d" " -f4 | cut -d":" -f2,3,4 | uniq -c | sort -n

Commands Reference

The selection of Unix commands used to conduct the above analysis (along with what they’re doing above) was:

  • zcat – prints the contents of a compressed file.
  • wc – counts the number of lines in a file (or input stream)
  • cut – splits data based on a delimiting character.
  • sort – sorts data, either alphabetically or numerically (via -n option).
  • uniq – removes duplicates from a list, or shows how much duplication there is.

Injecting Data into Scanned Vintage Photos

In a previous post, entitled Vintage Photo Scanning – A Journey of Discovery, I shared my experiences while digitising my parent’s entire vintage photo collection.

As part of that pet project, I also took the liberty of digitally injecting some of the precious data I had learned about them (i.e. when and where the photos were taken, and who was in them) into the photo files themselves, so that it would be preserved forever along with the photo is pertained to. This article explains how I did that.

Quick Recap

My starting point was a collection of around 750 digital images, arranged into a series of folders and subdirectories, and named in accordance with the following convention:

<Date>~<Title>~<People>~<Location>.jpg

So the task at hand was how to programmatically (and thus, automatically) inject data into each of these files, starting over if required, so that sorting them or importing them into photo management software later becomes much easier.

Ready, Steady, Bash!

In order to process many files at a time, you’re going to need to do a little programming. My favourite language for this sort of stuff is Bash, so expect to see plenty of snippets written in Bash from here on. I am also going to assume that you are running this on a Unix/Linux-based system (sorry, Mr. Gates).

Setup

While each photo will have a different date, title, list of people and location, there are some other pieces of data you like to store within them (while you’re at it), which you (or your grandchildren) may be glad of later on. To this end, let’s set up some assumptions and common fields.

Default Data

If you only know the year of a photo, you’ll need to make some assumptions about the month and day:

DEFAULT_MONTH="06"
DEFAULT_DAY="01"
DEFAULT_LOCATION="-"

Reusable File Locations

Define the location of exiftool utility or any other programs you’re using (if they are located in a non-standard part of your system), along with any other temporary files you’ll be creating:

EXIFTOOL=/usr/local/bin/exiftool
CSVFILE=$(dirname "$0")/photos.csv
GPSFILE=$(dirname "$0")/gps.txt
GPS_COORDS=$(dirname "$0")/gps-coords.txt
PHOTO_FILES=/tmp/photo-files.txt
PHOTO_DESC=/tmp/photo-description.txt

Common Metadata

Most photo files support other types of metadata including the make/model of camera used, the applicable copyright statement and of the owner of the files. If you wish to use these, you could define their values in some variables that can be used (for each file) later on:

EXIF_MAKE="HP"
EXIF_MODEL="HP Deskjet M4500"
EXIF_COPYRIGHT="Copyright (c) 2014, James Mernin"
EXIF_OWNER="James Mernin"

Data Injection

List, Iterate & Extract

Firstly, compile a list of the files you wish to process:

find "$IMAGE_DIR" -name "*.jpg" > $PHOTO_FILES

Now iterate over that list, processing one file at a time:

while read line; do
 # See below for what to do...
done < "$PHOTO_FILES"

Now split the input line to extract the 4 field of data:

BASENAME=`basename "$line" .jpg`
ID_DATE=`echo $BASENAME|cut -d"~" -f1`
ID_TITLE=`echo $BASENAME|cut -d"~" -f2`
ID_PEOPLE=`echo $BASENAME|cut -d"~" -f3`
ID_LOCATION=`echo $BASENAME|cut -d"~" -f4`

Prepare Date & Title

Prepare a suitable value for Year, Month and Day (taking into account the month and day maybe unknown):

DATE_Y=`echo $ID_DATE|cut -d"-" -f1`
DATE_M=`echo $ID_DATE|cut -d"-" -f2`
if [ -z "$DATE_M" ] || [ "$DATE_M" = "$DATE_Y" ]; then DATE_M=$DEFAULT_MONTH; fi
DATE_D=`echo $ID_DATE|cut -d"-" -f3`
if [ -z "$DATE_D" ] || [ "$DATE_D" = "$DATE_Y" ]; then DATE_D=$DEFAULT_DAY; fi

It’s possible the title of some photos may contain a numbered prefix in order to separate multiple photos taken at the same event (e.g. 01-School Concert, 02-School Concert). This can be handled as follows:

TITLE=$ID_TITLE
TITLE_ORDER=`echo $ID_TITLE|cut -d"-" -f1`
if [ -n "$TITLE_ORDER" ]; then
 if [ $TITLE_ORDER -eq $TITLE_ORDER ] 2>/dev/null; then TITLE=`echo $ID_TITLE|cut -d"-" -f2-`; fi
fi

Location Processing

This is a somewhat complex process but essential boils down to trying to determine the GPS coordinates for the location of each photo. This is because most photo file only support the GPS coordinates inside their metadata. I have used the Google Maps APIs for this step with an assumption that you get an exact match first time. You can, of course, complete this step as a separate exercise beforehand and store the results of that in a separate file to be used as input here.

In any case, the following snippet will attempt to fetch the GPS coordinates for the location of the given photo. Pardon also the crude use of Python for post-processing of the JSON data returned by the Google Maps APIs.

ENCODED_LOCATION=`python -c "import urllib; print urllib.quote(\"$ID_LOCATION\");"`
GPSDATA=`curl -s "http://maps.google.com/maps/api/geocode/json?address=$ENCODED_LOCATION&sensor=false"`
NUM_RESULTS=`echo $GPSDATA|python -c "import json; import sys; data=json.load(sys.stdin); print len(data['results'])"`
if [ $NUM_RESULTS -eq 0 ]; then
 GPS_LAT=0
 GPS_LNG=0
else 
 GPS_LAT=`echo $GPSDATA|python -c "import json; import sys; data=json.load(sys.stdin); print data['results'][0]['geometry']['location']['lat']"`
 GPS_LNG=`echo $GPSDATA|python -c "import json; import sys; data=json.load(sys.stdin); print data['results'][0]['geometry']['location']['lng']"`
fi

Convert any negative Latitude and Longitude values to North/South or West/East so that your coordinates end up in the correct hemisphere and on the correct side Greenwich, London:

if [ "`echo $GPS_LAT|cut -c1`" = "-" ]; then GPS_LAT_REF=South; else GPS_LAT_REF=North; fi
if [ "`echo $GPS_LNG|cut -c1`" = "-" ]; then GPS_LNG_REF=West; else GPS_LNG_REF=East; fi

Inject Data

You now have all the data you need to prepare the exiftool command:

EXIF_DATE="${DATE_Y}:${DATE_M}:${DATE_D} 12:00:00"
echo "Title: $TITLE" > $PHOTO_DESC
echo "People: $ID_PEOPLE" >> $PHOTO_DESC
echo "Location: $ID_LOCATION" >> $PHOTO_DESC

if [ -n "$ID_LOCATION" ]; then
 $EXIFTOOL -overwrite_original \
  -Make="$EXIF_MAKE" -Model="$EXIF_MODEL" -Credit="$EXIF_CREDIT" -Copyright="$EXIF_COPYRIGHT" -Owner="$EXIF_OWNER" \
  -FileSource="Reflection Print Scanner" -Title="$TITLE" -XMP-iptcExt:PersonInImage="$ID_PEOPLE" "-Description<=$PHOTO_DESC" \
  -AllDates="$EXIF_DATE" -DateTimeOriginal="$EXIF_DATE" -FileModifyDate="$EXIF_DATE" \
  -GPSLatitude=$GPS_LAT -GPSLongitude=$GPS_LNG -GPSLatitudeRef=$GPS_LAT_REF -GPSLongitudeRef=$GPS_LNG_REF \
  "$line"
 else
  $EXIFTOOL -overwrite_original \
   -Make="$EXIF_MAKE" -Model="$EXIF_MODEL" -Credit="$EXIF_CREDIT" -Copyright="$EXIF_COPYRIGHT" -Owner="$EXIF_OWNER" \
   -FileSource="Reflection Print Scanner" -Title="$TITLE" -XMP-iptcExt:PersonInImage="$ID_PEOPLE" "-Description<=$PHOTO_DESC" \
   -AllDates="$EXIF_DATE" -DateTimeOriginal="$EXIF_DATE" -FileModifyDate="$EXIF_DATE" \
   "$line"
 fi

Cross your fingers and hope for the best!

Apple iPhoto Integration

Personally, I manage my portfolio of personal photographs using Apple iPhoto so I wanted to import these scanned photos there too. And so the Data Injection measures above I took above simplified this process greatly (especially the Date and Location fields which iPhoto understands natively).

While I did then go on to use iPhoto’s facial recognition features and manually tag each of the people in the photographs (adding several weeks to my project), the metadata injected into the files helped make this a lot easier (as it was visible in the information panel displayed beside each photo) in iPhoto.

Return on Investment

Timescales

In all, this entire project took almost 9 months to complete (with an investment of 2-3 hours per evening, 1-2 nights per week). The oldest photograph I scanned was from 1927 and the most precious one was one from my early childhood holding a teddy bear that my own children now play with.

Benefits

The total number of photos processed was somewhere in the region of 750. And while that may appear to be a very long time for relatively few photographs, the return on investment is likely to last for many, many multiples of that time.

Upon Reflection

I’ve also been asked a few times since then, “Would I do it again?”, to which the answer is an emphatic “Yes!” as the rewards will last far longer than I could ever have spent doing the work.

However, when asked, “Could I do it again for someone else?”, that has to be a “No”. And not because I would not have the time or the energy, but simply because I would not have the same level of emotional attachment to the subject matter (either the people or the occasions in the photos) and I believe that this would ultimately be reflected in the overall outcome. So hopefully these notes will help others to take on the same journey with their own families.